|
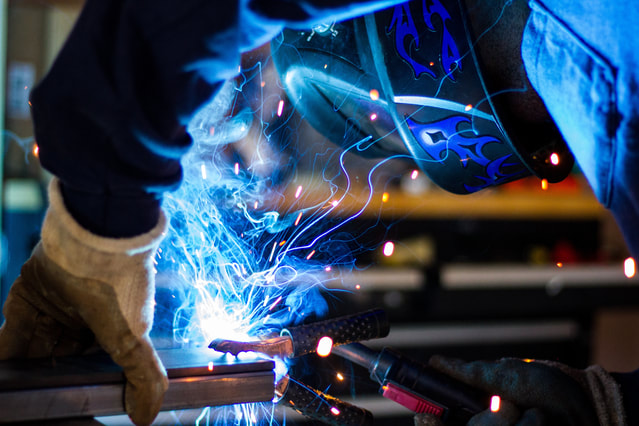
Welding is a common procedure used to join two or more pieces of metal for use in a wide range of applications. The process can be done at outdoor locations (e.g. farms, highways, construction sites) or in an indoor setting, typically shops and factories. Welding requires the following components: metals to be joined, a heat source, and a filler metal. The most common types of welding found in industrial environments are: Gas Tungsten Arc Welding (GTAW), Stick Welding, Gas Metal Arc Welding (GMAW), and Flux Core Arc Welding. [read: 4 Popular Types of Welding Procedures]
It may go without saying, but high-quality welding requires careful heating/temperature management. Temperature management before, during and after welding defines the preciseness and quality of the weld. Here are a few reasons why we’re careful about temperature control when it comes to welding: It can prevent some costly and time-consuming reworksWhen working on common materials like cast irons, copper (and its alloys) aluminum, and steels, proper heat dispersion and management prevents stress and weakened metals. Quick changes in temperature can mean extra work if not wasted materials. Take it from us: any time saved by cutting corners on heat control will only come back to haunt you. It’s better to take your time with temperature to maintain the integrity of your materials and product. It reduces the risk of Hydrogen Induced Cracking (HIC)Hydrogen Induced cracking, is “caused by the blistering of a metal due to a high concentration of hydrogen.” Carefully approaching the heating and cooling of welded materials allows hydrogen to be properly drawn out. This effectively reduces or eliminates the risk of HIC and, consequently, expensive and time-consuming reworks (see above). It relieves residual stress(THE SILVER BRIDGE IN OHIO, 1967, BELIEVED TO HAVE COLLAPSED DUE TO RESIDUAL STRESS FROM UNEVEN COOLING) In welding, the quick thermal expansion and reduction created along a very limited spot could become a major source of residual stress. This is stress that remains within an object/material after the external source of stress has been removed. While residual stress may be desirable in some engineering applications, uncontrolled residual stress should be avoided at all costs. This uncontrolled, undesirable stress leads to weak welds and premature structural failure. Residual stress frequently occurs when a welded metal’s temperatures are raised and quickly lowered with little or no control or when cooling occurs unevenly. Slowly and carefully removing heat from welded materials prevents the welded spot from becoming too fragile and ductile. At North Slope Chillers, we’re all about taking the stress out of welding temperature control (pun intended). Our products provide controlled, even cooling that will help maintain the strength and integrity of your welded products. Additionally, we offer custom solutions– whatever your cooling needs are, we can help! Give us a call at (866) 826-2993 if you’re interested in incorporating a chiller into your welding process.
1 Comment
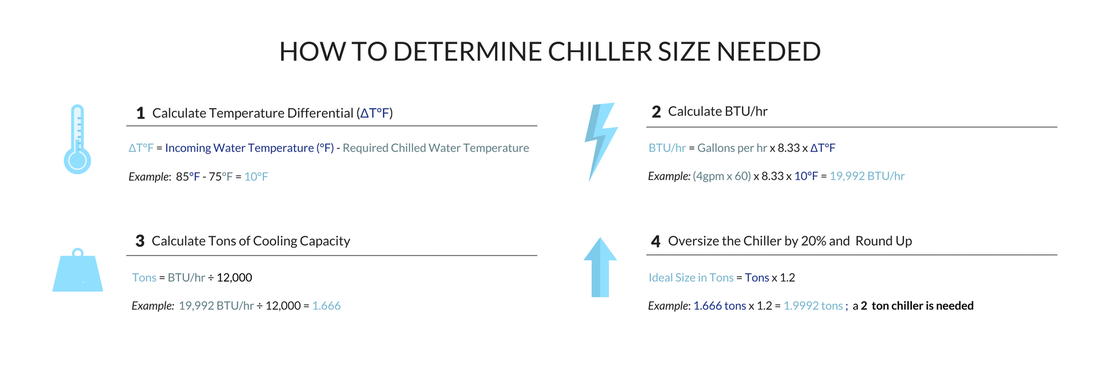
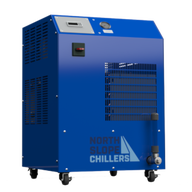 We cannot overstate the importance of selecting a correctly sized chiller. Undersized chillers won’t correctly cool your process equipment or materials. Oversized chillers will work just fine, but why pay more than you need to? When you select a chiller of the proper size, you can rely on several years of efficient cooling. Use the formula below to determine the chiller size that will most optimally meet your needs. The Formula Regardless of what you are cooling, this formula will determine your needed chiller size. Before jumping in, identify the following variables:
Step One: Calculate Temperature Differential (ΔT°F)ΔT°F = Incoming Water Temperature (°F) – Required Chilled Water Temperature.
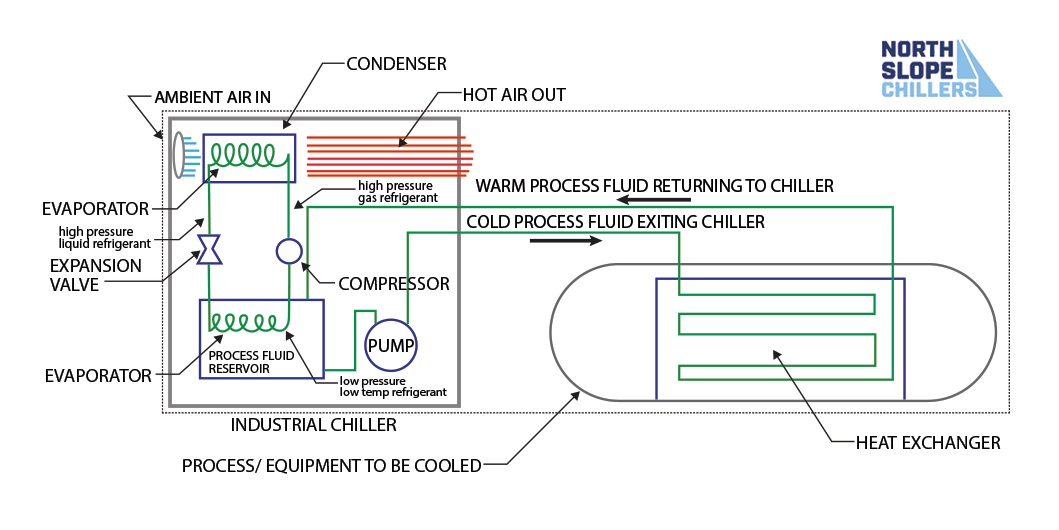
Example: ΔT°F = 85°F – 75°F = 10°F Step Two: Calculate BTU/hr.BTU/hr. = Gallons per hr x 8.33 x ΔT°F Example: (4 gpm x 60) x 8.33 x 10°F = 19,992 BTU/hr Step Three: Calculate tons of cooling capacityTons = BTU/hr. ÷ 12,000 Example: 19,992 BTU/hr. ÷ 12,000 = 1.666 tons Step Four: Oversize the chiller by 20%Ideal Size in Tons = Tons x 1.2 Example: 1.666 x 1.2 = 1.9992 Most likely, your “Ideal Size in Tons” is not going to come out to an even 1 ton, 5 tons, 20 tons, etc. Round up to determine which chiller size you will need. In this example, our final answer is 1.9992, which means we will need a 2-ton chiller. We hope this was helpful! Of course, if you have any questions or would like us to size your chiller for you, please give us a call at (866) 826-2993.  If you work with industrial machinery, you might use a chiller system to keep your machines from overheating. They can be very effective in keeping things at optimal temperatures, but how does a chiller work? Knowing how a chiller works can be helpful in choosing the best system to meet your needs. How a Chiller Works To put it simply, industrial chillers cool process fluids. Process fluids (typically water or a water/glycol mix) are used to cool machinery, equipment, food, etc. The process fluid absorbs heat from what is being cooled and then goes through the chiller where the heat is removed from the process fluid and transferred to the ambient air. Two Circuits Chiller systems contain two main circuits: a refrigeration circuit and a fluid circuit. The refrigeration circuit is made up of four components: the compressor, the condenser, the expansion valve and the evaporator. The refrigeration circuit removes heat from the process fluid. The fluid circuit is typically comprised of a process fluid reservoir, a pump, filters, and a heat exchanger. The fluid circuit carries the process fluid around the object being cooled. The Refrigeration Cycle Step by Step – Chiller DiagramThe refrigeration circuit is the most technical part of how a chiller works.The refrigeration cycle uses the principles of thermodynamics to efficiently move heat from one area to another. In the case of chillers, heat is taken from the fluid being chilled and transferred to the ambient air. 1. The Compressor The refrigeration cycle begins with the compressor. The compressor takes low-pressure low-temperature refrigerant in gas form and compresses it into a high-pressure high-temperature gas. 2. The Condenser This gas then flows through coils in the condenser. While in the condenser, air or water will flow over the coils and remove heat from the refrigerant. As the refrigerant loses heat it will begin to condense until all of the gas has condensed into a liquid. 3. The Expansion Valve After leaving the condenser, the liquid goes through the expansion valve. The expansion valve restricts the flow of refrigerant. When the high-pressure liquid goes through the expansion valve it enters the evaporator. 4. The Evaporator The evaporator is where the refrigerant starts evaporating back into a gas. When the refrigerant evaporates it gets very cold and absorbs a lot of heat. It is in the evaporator that the process fluid will interact with the cold refrigerant. Heat is removed from the fluid and transferred to the refrigerant. The refrigerant will then enter the compressor and the cycle begins again. North Slope ChillersNow that you know how a chiller works, you may be considering your chiller system options. North Slope Chillers boast the most advanced active refrigeration circuit available. They are easy to install, remove and relocate and will not disrupt the layout of your current system. Whether you’re looking to cool, freeze, or anything in between, North Slope offers a solution to meet your needs.
Additional resources https://www.thermalcare.com/how-does-a-chiller-work/ https://en.wikipedia.org/wiki/Chiller Search |
AuthorAmeritemp Group heating cooling dehumidification for rental for sale Archives
June 2018
Categories |
- Shop Online
-
Rental
-
Portable Generators Rentals
>
-
Portable Diesel Generator Rental
>
- G25 20kW Portable Diesel Generator Rental
- G40 30kW Portable Diesel Generator Rental
- G50 40kW Portable Diesel Generator Rental
- G70 60kW Portable Diesel Generator Rental
- G85 78kW Portable Diesel Generator Rental
- G145 115kW Portable Diesel Generator Rental
- G190 155kW Portable Diesel Generator Rental
- G240 190kW Portable Diesel Generator Rental
- G290 230kW Portable Diesel Generator Rental
- G325 260kW Portable Diesel Generator Rental
- G450 365kW Portable Diesel Generator Rental
- G570 465kW Portable Diesel Generator Rental
- HiPOWER Mobile Generators
- Power Calculator
- kVA-kW_Amperage_Chart
-
Portable Diesel Generator Rental
>
-
Chillers & Air Handler Rentals
>
-
Air Cooled and Water Cooled Industrial Chiller Rentals
>
- 5-Ton Air Cooled Chiller Specs
- 10 Ton Air Cooled Chiller Specs
- 20 Ton Air Cooled Chiller Specs
- 30 Ton Air Cooled Chiller Specs
- 50 Ton Air Cooled Chiller Specs
- 60 Ton Air Cooled Chiller Specs
- 100 Ton Air Cooled Chiller Specs
- 150 Ton Air Cooled Chiller Specs
- 200 Ton Air Cooled Chiller Specs
- 400 Ton Air Cooled Chiller Specs
- 500 on Air Cooled Chiller Specs
- Air Handlers Rentals
-
Air Cooled and Water Cooled Industrial Chiller Rentals
>
-
Cooling Rental Solutions
>
-
Heater Rentals
>
-
Direct Fired Heater Rentals
>
- Premier 80DF LP NG Heater Rental
- Tradesman 170 Propane or Natural Gas Heater Rental
- Premier 170 Propane Heater Rental
- Premier 170DF LP NG Heater Rental
- Premier 350DF - LP/NG Heater Rental
- Campo DF650F Duel Fuel LP NG Heater Rental
- Ameritemp AT500 - Duel Fuel LP/NG Heater Rental
- Ameritemp AT1000 Duel Fuel LP NG Heater Rental
- Ameritemp AT2000 Duel Fuel LP NG Heater Rental
- Ameritemp AT4000 Duel Fuel LP NG Heater Rental
-
Indirect Fired Heater Rentals
>
- LB White Foreman 230DF or Diesel Indirect Fired Heater Rental
- LB White Foreman 500DF or Diesel Indirect Fired Heater Rental
- Frost Fighter IDF500 Indirect Fired Heater Rental
- MAC 800 Mobile Indirect Fired Heater Rental
- Wacker Neuson HI900DGM Mobile Indirect Fired Diesel Air Heater Rental
- Heat Wagon 1 M LP NG or Diesel Indirect Fired Heater Rental
- Generac MAC Mobile 1.2M Indirect Fired Heater Rental
- Generac MAC Mobile 2.5M Indirect Fired Heater Rental
- Ground Heater Rentals >
-
Electric Heater Rentals
>
- Patron 1.5EH 1.5kW Electric Heater Rental
- Fostoria FES-1024-1CA 10EH 10kW Electric Heater Rental
- Fostoria FES-1524-3E 15EH 15kW Electric Heater Rental
- Fostoria FES-3048-3A 30EH 30kW Electric Heater Rental
- Fostoria FES-4548-3 45EH 45kW Electric Heater Rental
- Chromalox SDRA-6043RG 60EH 60kW Electric Heater Rental
- Campo Blaze 150E 150EH 150kW Electric Heater Rental
-
Direct Fired Heater Rentals
>
- Dehumidifier Rentals >
-
Power Distribution Rentals
>
-
Power Distribution Spider Boxes & Panels Rentals
>
- Spider Boxes & Panel Rentals >
- Cables and Accessories Rentals >
-
Rental Industrial and Commercial Portable Power Transformers
>
- 15KVA Skid Type Portable Power Rental Transformer
- 30KVA Skid Type Portable Power Rental Transformer
- 45KVA Skid Type Portable Power Rental Transformer
- 75KVA Skid Type Portable Power Rental Transformer
- 112.5KVA Skid Type Portable Power Rental Transformer
- 150KVA Skid Type Portable Power Rental Transformer
- 225KVA Skid Type Portable Power Rental Transformer
- 300KVA Skid Type Portable Power Rental Transformer
- 375KVA Skid Type Portable Power Rental Transformer
- 500KVA Skid Type Portable Power Rental Transformer
-
Power Distribution Spider Boxes & Panels Rentals
>
-
Fuel Tank Rentals
>
-
TransCube Fuel Tank Rentals
>
- 05TCG Auxiliary Fuel Tank Rental 132 Gallon
- 10TCG Auxiliary Fuel Tank Rental 264 Gallon
- 20TCG Auxiliary Fuel Tank Rental 528 Gallon
- 30TCG Auxiliary Fuel Tank Rental 793 Gallon
- 40TCG Auxiliary Fuel Tank Rental 1000 Gallon
- 50TCG Auxiliary Fuel Tank Rental 1198 Gallon
- 100TCG Stationary Fuel Storage Tank Rental 2,232 Gallon
-
TransCube Fuel Tank Rentals
>
- Portable Light Tower Rentals >
- Air Compressor Rentals
- Buy Used Equipment
-
Portable Generators Rentals
>
- HVAC
-
Products
-
Temporary Heaters
>
- Power Blankets Ground Heat >
-
Electric Heaters
>
- TPI Milk House Electric Heater
- Patron Electric Heaters
- TPI Fostoria FSS
- TPI Fostoria FSP
- TPI Fostoria Portable Electric Salamander Heat
- TPI Fostoria Wall Ceiling Mount Electric Heat
- TPI Taskmaster Electric Heater
- Chromalox DRA Portable Electric Salamander Heat
- Berko BDH Portable Electric Salamander Heat
- BERKO Electric Ceiling Wall Heater
- Kerosene Heaters >
- Natural Gas/Propane Forced Air Heaters >
- Indirect Fired Heaters >
- Pressurize
- Portable Diesel Generators >
- Power Distribution >
-
Temporary Cooling
>
- Chillers - Air Handlers >
- Industrial Commercial Construction Lighting >
- Light Towers >
- Dehumidifiers >
-
Air Movers
>
- XPOWER >
-
DRI-EAZ Air Movers
>
- DRI-EAZ DefendAir HEPA 500 - Filtration Restoration
- DRI-EAZ Guide To Air Scrubbing
- F174-BLU DRI EAZ Airmover Vortex Axial Fan
- F228 DRI EAZ Airmover AirWolf
- F259 DRI EAZ Airmover Ace
- F377 DRI EAZ Airmover Studebaker AirPath
- F350 DRI EAZ Airmover Sahara E
- FX4 DRI EAZ Airmover Sahara Pro X4 TurboDryer
- F352 DRI EAZ Airmover Sahara HD
- F367 DRI EAZ Airmover Jet CXV TurboDryer
- F451 Dri-Pod Floor Dryer
- Shaefer Americ Air Movers >
- Extraction >
- Baldwin Top Sellers
- Petroleum Tanks & Equipment >
- Portable Deisel Air Compressors
- Generators Standby >
-
Temporary Heaters
>
- Events
- Disaster Relief
- Contact Us
- About
- Careers
-
Videos
-
L.B. White Videos
>
- Step by step how-to videos for Foreman Indirect-Fired Portable Heaters.
- Step by step how-to videos for Sun Blast Radiant Heaters.
- Step by step how-to videos for Tradesman Portable Kerosene Heaters.
- Step by step how-to videos for Premier Portable Forced Air Heaters.
- Step by step how-to videos for Tradesman Portable Forced Air Heaters.
- Master Heater Videos >
-
L.B. White Videos
>
- Blogs
- RFQ
- More
|
AmeriTemp Group 24/7
Nationwide Service 800-579-7368 71 lbs. or large packages will ship LTL Freight For expedited shipments please call (815) 385-2350 |
AmeriTemp Group Rental and Products Page
AmeriTemp Line Card AmeriTemp Portable Temporary Chiller Rental AmeriTemp HVAC Services AmeriTemp Air Conditioning AC Rental AmeriTemp Diesel Generator Rental AmeriTemp Portable Heater Rental AmeriTemp Temporary Dehumidifier Rental AmeriTemp Rental Fuel Tanks AmeriTemp SOOW Power Cable Cord Product |
Copyright © 2017 AmeriTemp Group - All Rights Reserved. 24 x 7 Nationwide Service Available. Call for Details. AmeriTemp Group 3314 N. Richmond Road Johnsburg, IL 60051 Phone 815-385-2350
Fax 815-385-2940
Fax 815-385-2940
Website services provided by: Newmedia Design Solutions, Inc. Site created and managed by: www.newmediab2b.com/

 RSS Feed


